


It's not true that you need the most expensive DSLR to take amazing photos for your blog. In all of the photography classes I've taken, I've heard,"it's not about the camera". You can have the fanciest camera and still not know how to use the settings. In contrast, you can snap away with your phone camera and still get high quality photos.
Now, I know using a DSLR has so many benefits: you have more flexibility with editing the RAW file photos and then editing on Photoshop (or GIMP). To be honest, I use both my Nikon D5000 and my iPhone 6 for my blog photos. Although I love the endless possibilities of editing my DSLR photos, I enjoy the editing process with my phone too, as long as I have the right lighting. In fact, some of my most commented blog posts consisted of only using phone photos, such as my review of the Charlotte Tilbury Matte Revolution lipsticks. The principles of good photography and design still apply with phone photos: you still need great lighting (natural bright lighting as much as possible) and creative composition.
I use the photo editor app VSCO for my phone blog photos. Cecilio actually introduced VSCO to me. He primarily uses the presets (filters), but I prefer to edit manually. I like having more control over how I want my photos to look. This is especially important in beauty blogging when you need the colors of the product to be as accurate as possible.
Here's a step-by-step tutorial on how I use VSCO to edit my photos:

Open up the VSCO app. On the left screenshot above, you will see the "+" on the top right corner. Select your photo and double tap.

Press on the symbol below with the double sliding lines to go to the VSCO editor. You can adjust the exposure, contrast, shadows, highlights, and even specific color tints and skin tones. But I only adjust the exposure, contrast, saturation and temperature. I also crop and sharpen the photo. So we will only touch upon those things.
Increasing the Exposure
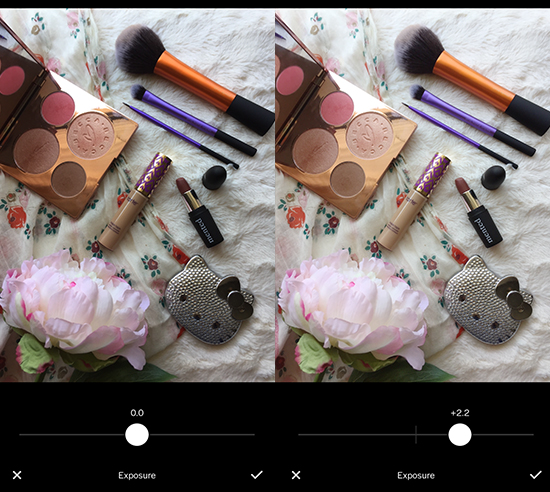
The exposure is the most important thing to edit because you want your photos to be as bright as it was in person. I shot the photo right next to the window in my living room (where I shoot all of my blog photos) because that's it faces the sun. However, it still looks dreary. Depending on how dark the photo is, I like to adjust the slide between +0.7 to +2.5.

Editing the contrast is where you can see the photo pop, even in a subtle way. Contrast is the difference between the light and dark parts of the photo. The lights get brighter, and the darks get deeper. Notice how the Tarte Shape Tape Concealer and the peony on the right photo are brighter. The fuzzy blanket background and the scarf also slightly brighter. The shadows in the BECCA palette are also a bit darker. It's not as noticeable, but this is where the devil is really in the details. I don't like to go above +2 for contrast because it starts to look unnatural, and you lose the fuzzy details of the blanket.

You can crop your photo to however short and/or narrow you want, or you can use any of the aspect ratios you want below. Using the aspect ratios automatically crops both the height and the width of the photo for you. This is great if you have too much empty space on the edges of the photo and you want to crop for a tighter composition. I am using the 4:5 aspect ratio as you can see in the example above. I have heard though that the 2:3 is ideal for Pinterest.

I made the photo examples above close up so that you can see the details better. On the left is the unsharpened version, and on the right I sharpened it to +3. If you want the textures in yours photos to really pop out (to where you can almost touch them), sharpening is a must. Notice how the BECCA logo and heart engraved on the highlighter on the right is crisper. The Tarte logo on the concealer can be seen more clearly as well. You can also see more of the fuzz on the white fuzzy blanket. Be careful not to over-sharpen because your photo will end up looking grainy.

Saturation is about the intensity and depth of the colors in the photo. If you want something more muted and almost grayscaled, you would decrease the saturation. But I want the colors to pop so I increase the saturation. On the right photo, the shades of the BECCA palette (and the palette itself), the concealer, Hello Kitty mirror and peony are more vivid.

Lastly, I like to slightly adjust the temperature because I like for my photos to be a little bit warmer toned. The camera doesn't capture the photo exactly how the image was in person, so it ends up looking duller. To bring it back to life and make sure that the colors are more accurate, I slide the temperature no more than +1. Anything below 0 leads you more to a cooler-toned image.

Once you're completely done, press the . . . symbol on the bottom right corner. It will then give you an option on different photo sizes to save. I go for the Actual Size option, and then email the photo to myself (or save it onto Google Drive) to decrease the size on Photoshop. For all of my blog images, the width is 550 px.
I hope this helps you up your blog photography game, and that you can still take beautiful photos on your phone. Happy editing!
Do you prefer taking your blog photos with your DSLR, point-and-shoot, or phone?
How do you edit your photos?


![Ronaldo Fernandes feat. Anderson Mário - Tás A Confundir (Zouk) [Download mp3]](https://blogger.googleusercontent.com/img/b/R29vZ2xl/AVvXsEhEoBxA4KTbH3jhXOp_JTlLcALXrHmnDrW5lGB2GA-oXxb06JLRRq2mQoyKfS9XDYiZfpNNbLnTG0KyGZ-i7he-xjHA1ckDR53xGNgejHaWquiAV1VLOIxx6zNGwuR8D-0rBgIJgTtaij8/w100/Ronaldo+Fernandes+-+T%25C3%25A1s+a+Confundir+%2528feat.+Anderson+M%25C3%25A1rio%2529.JPG)


0 Yorumlar